Choosing the best wire crimping tool is important for electricians who need secure and reliable electrical connections. A suitable manual crimping tool helps attach compatible terminals to wires when the correct connector, wire size, and crimping die are used.
Whether you work on residential wiring, electrical panels, control cabinets, or general electrical repairs, the right crimping pliers can make your work easier and more consistent. This guide explains the main types of manual wire crimping tools, the features to consider, and how to choose and use the right tool for your needs.
What Is a Wire Crimping Tool?
A wire crimping tool is a hand tool designed to attach a compatible terminal or connector to the end of an electrical wire. It uses pressure to deform the connector around the conductor, creating a mechanical connection.
Electricians commonly use crimping pliers with ring terminals, spade terminals, butt connectors, and other compatible electrical terminals. The correct tool depends on the connector design, wire size, and manufacturer’s specifications.
A crimping tool is not the same as a wire stripper. A crimper attaches terminals, while a wire stripper removes insulation from the conductor. For help choosing a tool for wire preparation, see our guide to the best wire stripper and cutter electricians.
Choosing the Best Wire Crimping Tool
1. Standard Terminal Crimping Pliers
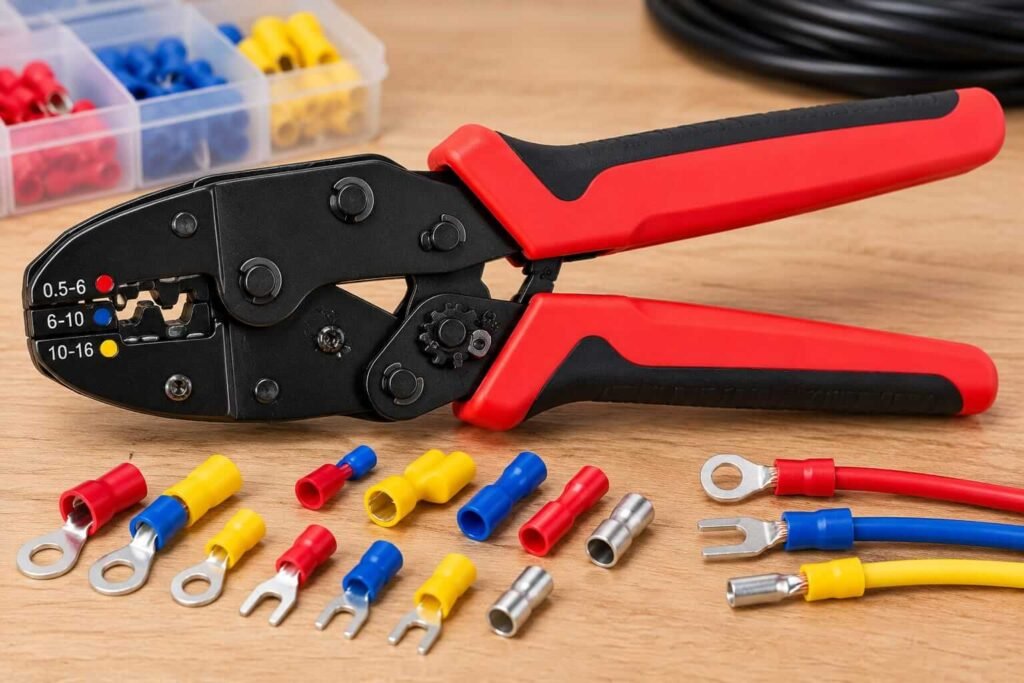
Standard terminal crimping pliers are commonly used for everyday electrical repairs and general wiring tasks. Many models have marked crimping positions for specific sizes of insulated or non-insulated terminals.
Some designs also include wire-cutting or wire-stripping features. However, their capabilities vary, so always check which terminal types and wire sizes the tool supports.
2. Ratcheting Crimping Pliers
Ratcheting crimping pliers use a ratchet mechanism that helps maintain pressure during the crimping process. Many models are designed to complete a full crimping cycle before releasing, helping produce more consistent results when used correctly.
These tools can be useful for electricians who make many connections during a job. Check that the crimping dies match the terminals you intend to use.
3. Crimping Pliers for Insulated Terminals
These pliers are designed for compatible terminals that have a coloured insulating sleeve. Some tools use colour-coded positions to indicate different terminal sizes.
Colour coding is not universal across every manufacturer, so confirm the supported wire sizes and terminal specifications before use.
4. Crimping Pliers for Non-Insulated Terminals
Non-insulated terminals require a suitable crimping profile that forms the metal connector around the conductor without relying on an insulating sleeve.
Choose a tool specifically designed for the terminal type. A crimper intended for insulated terminals may not create the correct connection on a non-insulated connector.
If you also work with wire ferrules, read our guide to the best ferrule crimping tools for electricians for more information about tools designed for ferrule connections.
Important Features to Consider
Wire Size and Terminal Compatibility
Check the tool’s specified wire-size range and the terminal types it supports. The crimping die must match the connector and conductor size. A tool that fits one type of terminal may not be suitable for another.
Crimping Die Design
The shape of the crimping die affects how pressure is applied to the terminal. Choose a tool with the correct die profile for your connector rather than assuming one design works for every terminal.
Handle Comfort and Grip
Comfortable handles can make manual crimping easier, especially when performing repeated connections. Look for a secure grip and a handle design that allows you to apply controlled pressure.
Build Quality
Look for sturdy construction, aligned jaws, a reliable pivot, and clear size markings. Manufacturer documentation can help you compare supported terminals and maintenance requirements.
Ratchet Mechanism
If you frequently make multiple crimped connections, a ratcheting model may help improve consistency. Make sure the release mechanism works correctly and follow the manufacturer’s instructions.
How to Use a Wire Crimping Tool Correctly
- Disconnect the power. Verify that the circuit is de-energized before preparing wires or making connections.
- Choose the correct terminal. Confirm that the connector is suitable for the conductor and intended application.
- Strip the wire carefully. Remove the required length of insulation without cutting or damaging the conductor strands.
- Insert the conductor. Place the stripped wire fully into the terminal barrel as specified by the connector manufacturer.
- Select the correct crimping position. Match the tool’s die to the terminal type and wire size.
- Apply firm, controlled pressure. Position the terminal correctly and operate the tool according to its instructions.
- Inspect the connection. Check for a properly formed crimp, damaged insulation, loose strands, or exposed conductor where it should not be visible. Perform any required mechanical or electrical checks.
If the connection is loose, damaged, or incorrectly crimped, replace the terminal and repeat the process with the correct tool and materials.
Common Wire Crimping Mistakes
Using the Wrong Crimping Tool
A tool designed for a different terminal type may produce an unreliable connection. Always match the tool and die to the connector manufacturer’s specifications.
Choosing the Wrong Wire Size
A terminal that is too large or too small for the conductor may not hold securely. Confirm compatibility before crimping.
Damaging the Conductor
Cutting conductor strands while stripping the insulation can weaken the connection. Use a suitable wire stripper and remove only the required amount of insulation.
Applying an Incorrect Crimp
Poor positioning or an unsuitable die can deform the terminal incorrectly. Follow the manufacturer’s instructions and inspect every finished connection.
Reusing a Damaged Terminal
Do not reuse a terminal that has been incorrectly crimped or damaged. Remove it and use a new compatible connector.
Wire Crimping Tool vs. Wire Stripper
A wire crimping tool and a wire stripper perform different jobs. A crimper attaches a compatible terminal to a conductor, while a wire stripper removes insulation before the connection is made.
Both tools are useful for electrical wiring. Using the correct tool for each step helps avoid conductor damage and improves the quality of the finished connection.
Manufacturer Resources for Manual Crimping Tools
When comparing manual crimping pliers, consult technical information from established tool manufacturers. For example, Milwaukee provides specifications for its Comfort Grip Crimping Pliers, including supported terminal types and wire-size ranges.
This example illustrates why checking the manufacturer’s specifications is more useful than choosing a crimping tool based on appearance alone.
Electrical Safety Tips
Always disconnect the power and verify that the circuit is de-energized before preparing or crimping wires. Follow applicable electrical codes and the instructions supplied with the tool and connector.
Do not assume that insulated-looking handles make a crimping tool suitable for live electrical work. Use only equipment specifically rated and approved for the intended task, and never work on energized circuits unless you are qualified and following the required safety procedures.
Final Thoughts
The best wire crimping tool for electricians depends on the terminals you use, the wire sizes you work with, and the type of electrical installation you perform. Standard terminal crimping pliers can suit many general wiring tasks, while ratcheting models may be useful when consistent crimping is important.
Before buying, check terminal compatibility, supported wire sizes, die design, handle comfort, and build quality. Choosing the right manual crimping tool and using it according to the manufacturer’s instructions can help you make more reliable electrical connections.